
Did you know that at Unredacted, we operate dedicated high-bandwidth Tor snowflake proxies? Well, you can help us in our mission and join Operation Envoy by running your own.
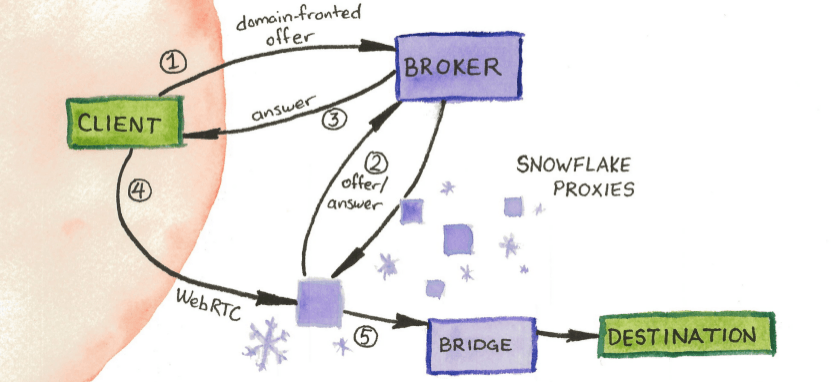
Tor snowflake proxies help individuals in countries with heavy internet censorship connect to the Tor network. They act similarly (although different) to Tor bridges which also have the same purpose, helping people evade internet censorship. This guide will detail how you can help run critical Tor snowflake proxies, and provide uncensored internet access to those in need whether you are technical or not.
Before you begin, keep in mind that running a snowflake proxy should only be done inside of countries or networks in which you would not get in trouble for running one. While there is little risk, and you will not receive abuse from users that connect to your proxy, government entities in China or Iran for example could flag you or your network for attempting to run one.
How To:
- Run a snowflake proxy in your browser (beginner)
- Run a snowflake proxy on TrueNAS Scale (intermediate)
- Run a snowflake proxy on a Linux server (advanced)
Run a snowflake proxy in your browser
If you are not technical, or don’t have the time to operate a dedicated snowflake proxy, the best way is to run a simple browser extension. If you run a browser like Brave, you can install the Chrome extension.


Once you’ve installed the extension it will automatically accept connections from users trying to circumvent censorship while you have your browser open.
You can click the addon’s icon and check how many users connect to your proxy, and have the extension run in the background even if your browser is closed (recommended).

Run a snowflake proxy on TrueNAS
If you have a NAS at home like many people do, you can run a snowflake proxy via a Docker container. For this guide, we will go over how to deploy your own snowflake proxy on TrueNAS Scale. This guide was written using TrueNAS Scale 23.10 (Cobia), so documentation may differ in newer or older versions.
Step 1: Login to your TrueNAS Scale dashboard, then navigate to “Apps.”

Step 2: Click “Discover Apps.”

Step 3: Click “Custom App.”

Step 4: Name your application (can be anything). Enter the following in “Image repository.”
thetorproject/snowflake-proxyAll other defaults can be left as is.

Scroll down and press “Install”

Step 5:
After the app is installed, it should be running.
You can then ensure everything is working fine by clicking on the app in the list, and clicking the “View Logs” button.

Press “Choose” (defaults are fine).

You should then see something similar about the snowflake proxy starting and the NAT type. If so, then it’s working!

Now you have a snowflake proxy running 24/7 on your NAS, providing uncensored internet access. You can check the logs hours or days later to see how many connections your proxy has served.
Run a snowflake proxy on a Linux server
If you are familiar with Linux, snap and/or Ansible, using this guide is arguably the best way to run snowflake proxies. The reason being is that you can rent VPS/VDS/VMs with more resources and bandwidth to dedicate to your snowflake proxy’s operation. This is what we do to provide a more consistent experience for proxy users.
It is important to keep in mind that this option should be for intermediate level or experienced administrators. Maintenance of these servers is key, and they shouldn’t be left to run on old operating systems and software versions.
Where to find hosting providers:
Some established hosting providers:
- DigitalOcean – big name provider with decent prices (always has stock)
- Vultr – DigitialOcean competitor, better pricing (always has stock)
- DartNode – good for unlimited bandwidth (usually has stock)
- BuyVM / Frantech – good for unlimited bandwidth (usually low stock)
Once you’ve found a hosting provider, you can begin deploying your snowflake proxy with snap or Ansible. This guide assumes that you have already installed snap or Ansible, and are deploying from macOS or Linux if using Ansible.
Install a snowflake proxy with snap
This is method arguably the easiest & care-free way to run a snowflake proxy. It’s especially useful if you are running them on one or a few servers.
Step 1: Install snapd via the official guide
Step 2: Install the snowflake proxy via snap
sudo snap install tor-snowflakeAnd that’s it, your snowflake proxy should be running. Snaps automatically update as well for peace of mind.
You can check the daemon logs via the following command, and the logs should look similar to this on start.
sudo snap logs tor-snowflake.snowflake
user@machine:~$ sudo snap logs tor-snowflake.snowflake
2023-12-03T05:52:07-05:00 systemd[1]: Started Service for snap application tor-snowflake.snowflake.
2023-12-03T05:52:07-05:00 tor-snowflake.snowflake[7055]: 2023/12/03 10:52:07 Proxy starting
2023-12-03T05:52:39-05:00 tor-snowflake.snowflake[7055]: 2023/12/03 10:52:39 NAT type: restricted
Install a snowflake proxy with Ansible
For this setup, we will be using the nvjacobo.snowflake Ansible role.
Step 1: Install the Ansible role via your CLI with the command below.
ansible-galaxy install nvjacobo.snowflakeStep 2: Create a directory for your new Ansible playbook and navigate to it.
mkdir ansible-snowflake-proxies
cd ansible-snowflake-proxies
Step 3: Create a file named “playbook.yml” and include the following:
- name: Run the nvjacobo.snowflake role and include custom vars
  remote_user: root
  hosts: '{{ target }}'
  roles:
    - nvjacobo.snowflake

  pre_tasks:
  - name: Remove the snowflake repo to grab it fresh
    ansible.builtin.shell: "rm -rf /home/snowflake"
If you want to define variables that differ from the defaults, you can do so and look at the role’s defaults/main.yml file.
Step 4: Define your new snowflake proxy server in your Ansible inventory, and run the playbook against your server. Modify the below command to fit your needs.
ansible-playbook playbook.yml -i inventory_file --extra-vars "target=snowflake-proxy-servers"If everything executed successfully, you now have a dedicated snowflake proxy running, and you’re doing your part to aid those in countries with heavily censored internet access.
Make sure you watch the Ansible role, nvjacobo.snowflake for updates and ensure your snowflake proxy gets updated with new snowflake software releases by re-running the playbook.